If you are considering tooth replacement, the phrase dental implant procedure step by step usually means one thing: you want to know exactly what will happen, in what order, and what is normal at each stage. That is the right question to ask before any surgical treatment. A clear sequence reduces anxiety, helps you prepare, and makes it easier to judge whether the plan is thoughtful and predictable.
An implant is not just a screw placed in bone. It is a treatment process that starts with diagnosis, continues through surgical and healing phases, and ends only when the implant is functioning comfortably and looks natural in the smile. In straightforward cases, treatment can move quickly. In complex cases, especially when there is bone loss, infection, or a tooth that must be removed first, the timeline changes. That does not mean the case is unsuitable. It means the protocol has to match the biology.
Dental implant procedure step by step: the real sequence
1. Consultation, examination, and imaging
The first step is not surgery. It is diagnosis. A proper implant consultation includes a clinical exam, review of your medical history, and imaging, most often a CBCT scan when implant planning requires three-dimensional evaluation. This allows the surgeon to measure bone width and height, assess the position of the sinus or nerve, and detect hidden problems such as root fractures, cysts, or chronic infection.
This stage also determines whether the site is ready for immediate implant placement or whether preparation is needed first. Sometimes the tooth can be removed and the implant placed in the same appointment. Sometimes it is safer to stage the treatment. The difference depends on bone quality, inflammation, soft tissue condition, bite forces, and esthetic demands.
A careful plan also covers the prosthetic end result. Implant surgery should not be separated from the future crown, bridge, or full-arch restoration. Position matters as much as integration. This is why digital planning and, in selected cases, surgical guides can improve precision.
2. Treatment planning and case preparation
Once the diagnosis is complete, the surgeon builds the sequence. For one patient, this may be a simple extraction and immediate implant. For another, it may involve periodontal treatment, temporary restoration, bone grafting, sinus lift, or staged healing.
This is also the point where the details become practical. You discuss anesthesia, expected healing, temporary tooth options, medications, and post-op restrictions. A good plan is specific. It should explain what is included, how many visits are likely, and what factors could change the timeline.
If there is major bone deficiency, grafting may be recommended before or during implant placement. If the upper back jaw lacks vertical bone because of sinus expansion, a sinus augmentation may be needed. These are not complications. They are part of proper preparation in anatomically limited cases.
3. Tooth extraction, if needed
Not every implant patient still has the failing tooth in place, but many do. When a damaged tooth cannot be saved, extraction is the next step. The technique matters. Atraumatic removal helps preserve the surrounding bone and soft tissue, which directly affects the future implant result.
After extraction, the surgeon evaluates whether immediate implant placement is appropriate. This decision is based on primary stability, absence of uncontrolled infection, the integrity of the socket walls, and the ability to position the implant correctly. Immediate placement is efficient, but it is not automatically the best option in every case.
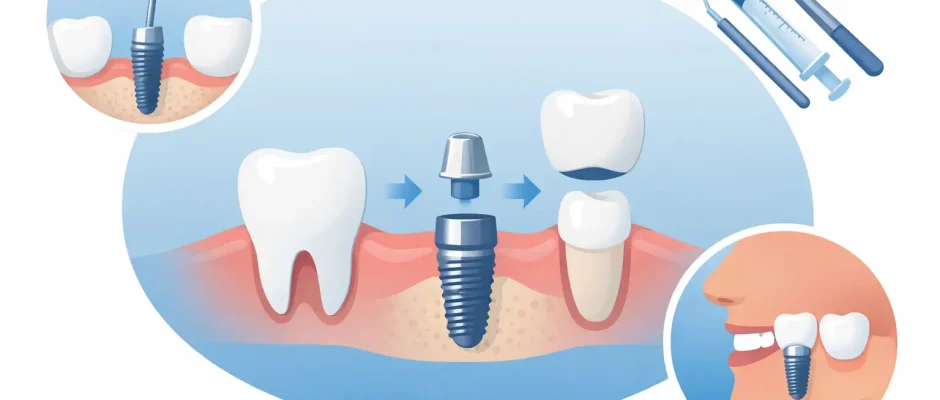
4. Implant placement surgery
This is the step most patients imagine first, but by now much of the important work has already been done. Under local anesthesia, and sometimes with additional sedation if indicated, the implant site is prepared using a controlled drilling sequence. The implant is then inserted into the bone at a planned depth and angle.
In guided surgery, a surgical template may help transfer the digital plan accurately to the mouth. In conventional surgery, the same principles apply, but the surgeon relies directly on anatomy, measurements, and clinical experience. Neither approach is a shortcut. The goal is precise, stable, biologically sound placement.
If there is a gap between the implant and socket wall, bone graft material may be added. In selected cases, PRF may be used to support healing of soft tissue and surgical sites. The gum is then either closed over the implant or shaped around a healing abutment, depending on the protocol.
The procedure itself is usually shorter and more comfortable than patients expect. For a single implant, surgery often takes less time than removing a difficult wisdom tooth.
What happens after implant surgery
5. Early healing in the first days
Some swelling, tenderness, and minor oozing are normal in the first 24 to 72 hours. Pain is usually manageable with standard medications prescribed or recommended by the surgeon. The intensity varies. A simple implant in dense bone may produce very little discomfort. A case involving extraction, grafting, or multiple implants can feel more demanding.
Patients often worry that feeling pressure or mild throbbing means something is wrong. Usually it does not. What matters more is the trend. Symptoms should gradually improve, not worsen. Clear post-op instructions make a difference here: cold application, soft diet, oral hygiene around the site, and avoiding unnecessary mechanical trauma.
6. Osseointegration
The next stage is mostly invisible, but it is the core of implant treatment. Osseointegration is the process by which bone heals around the implant surface and stabilizes it biologically. This period often takes a few months, although exact timing depends on bone quality, implant stability at placement, whether grafting was performed, and overall health factors such as smoking or diabetes control.
This is where patience matters. Patients often feel normal long before the implant is ready to carry full load. A stable-looking implant is not always a fully healed implant. Rushing the restorative stage can compromise the long-term result.
7. Uncovering the implant or placing a healing abutment
If the implant was buried under the gum during the initial surgery, a minor second-stage procedure may be needed after integration. This allows the surgeon to place a healing abutment that shapes the gum for the final restoration. In other cases, the healing abutment is placed during the original surgery, so no separate uncovering is required.
This step is usually simple and brief. It is more about soft tissue management than major surgery.
8. Impression or digital scan for the crown
Once the implant is ready, the restorative phase begins. An impression or digital scan records the implant position and surrounding gum contours. The lab then fabricates the final crown, bridge, or full-arch prosthesis.
This stage affects both function and esthetics. The final tooth should be easy to clean, stable under bite forces, and harmonious with neighboring teeth. In the front of the mouth, even small decisions about implant depth, gum support, and emergence profile can change the appearance significantly.
9. Delivery of the final restoration
The finished restoration is connected to the implant with either a screw-retained or cemented design, depending on the case. The bite is checked carefully. Contacts with adjacent teeth are adjusted. You are then shown how to clean around the implant.
From the patient perspective, this is the moment treatment feels complete. Clinically, however, maintenance starts here. Even a perfectly integrated implant can develop problems if plaque control is poor, if there is overload from the bite, or if follow-up is neglected.
When the timeline is longer
A step-by-step explanation should also include the situations where treatment cannot be compressed. If there is severe bone loss, active infection, or a high esthetic demand in the front teeth, a staged protocol may be safer than an immediate one. Bone grafting may need to heal before implant placement. Soft tissue grafting may be required to improve gum thickness. Full-arch cases such as All-on-4 follow a different sequence and can combine extractions, implant placement, and temporary fixed teeth in a tightly planned protocol.
None of this is a sign that the case is failing. It simply means the surgeon is choosing predictability over speed.
Risks, limitations, and what affects success
Implants have high success rates, but they are not mechanical guarantees. Smoking, uncontrolled diabetes, untreated periodontal disease, poor hygiene, teeth grinding, and inadequate bone can all increase risk. Surgical skill and planning matter, but patient factors matter too.
There are also anatomical limits. In the upper jaw, the sinus may reduce available bone. In the lower jaw, the inferior alveolar nerve defines a safety boundary. This is why preoperative imaging and precise planning are not optional extras in modern implantology.
For anxious patients, one more point is worth emphasizing: discomfort and risk are not the same thing. A well-executed procedure can involve temporary swelling yet still be progressing normally. On the other hand, a procedure that feels easy on day one still requires disciplined healing and follow-up.
If you are choosing a surgeon, look for a plan that is clear, medically reasoned, and adapted to your anatomy rather than sold as a one-size-fits-all package. In implant surgery, confidence should come from good diagnostics, careful technique, and a treatment sequence that makes sense for your specific case. That is what turns a procedure into a predictable result.
Comments (0)